A closer look at the detail and craftsmanship that goes into every Tiffany Knot design. #KnotYourTypicalCity #TiffanyAndCo
Discover #TiffanyKnot: https://bit.ly/38tfgiw

Search
A closer look at the detail and craftsmanship that goes into every Tiffany Knot design. #KnotYourTypicalCity #TiffanyAndCo
Discover #TiffanyKnot: https://bit.ly/38tfgiw
An elemental form becomes a provocative design at the hands of our master artisans. Every Tiffany Knot double row hinged bangle takes over 22 hours to complete. #KnotYourTypicalCity #TiffanyAndCo
Discover #TiffanyKnot: https://www.tiffany.com/stories/guide/knot-your-typical-city/
The new Tiffany Knot features a double wrap design, punctuated by a knot that conceals the clasp. Whether you want it with or without pavé diamonds is up to you. #KnotYourTypicalCity #TiffanyAndCo
Discover #TiffanyKnot: https://bit.ly/3ga28TI
DIY Smartphone Ring! Easy Fringe Design
アイフォンケースを衣替え!結んで作る簡単フリンジケース
creator:勝又美蘭 Instagram @fantasia_miran
[Things to prepare]
・yarn
・ Wood ring (round)
・ Adhesive (Quick-drying clear etc.)
・toothpick
・ Round can
・ Smartphone ring holder
[How to make]
1. Make 10 sets of 5 threads.
2. Attach each set to wood parts.
3. Apply a thin layer of adhesive to the knot and dry.
4. Adjust the length with scissors.
5. Connect the ring holder and thread with a round can.
6. Remove the seal from the ring holder and attach it to the case.
秋冬に大活躍のフリンジアイテム!
結ぶだけでできるので初心者さんでも簡単に作れちゃいます!
【用意するもの】
・糸
・ウッドパーツ リングラウンド
・接着剤(速乾アクリアなど)
・爪楊枝
・丸カン
・リングホルダー
【作り方】
1. 糸を 5 本ずつ 10 セット作る。
2. ウッドパーツに 10 セット結ぶつける。
3. 結び目に接着剤を薄くつけて乾燥させる。
4. ハサミで長さを調節する。
5. 丸カンでリングホルダーと糸を 4 を繋ぐ。
6. リングホルダーのシールを剥がし、ケースに接着させて完成。


Another kawaii pink tutorial by Kimura U here : https://www.youtube.com/watch?v=nj8XNXZrMAU
Watch all the videos with Kimura U : Watch all the videos with Kimura U : https://www.youtube.com/watch?v=QwEGUzhRZdM&list=PL7k_Q9ypWTRIECJz91QdUIwHYc9lArKze
KAWAII♥PATEEN SKILL-UP #18
SHINY COLOR MASCARA makeup TUTORIAL
by KOKOkim fashion designer Kimura U
- ピンクカラーマスカラメイク講座 -
U Kimura now takes a new creative challenge :
COLOR MASCARA!
Look how she manages to blend pink fashion and pink makeup!
For even more fun, just check the following videos with Kimura U :
Handmade craft tutorial : Kawaii Hair clip accessory : https://www.youtube.com/watch?v=HMQgdfXU72E
Naruto's Sasuke cosplay makeup : https://www.youtube.com/watch?v=QwEGUzhRZdM
Attack on Titan's female Titan makeup : https://www.youtube.com/watch?v=Eg5Z1FBNUqk
—
Tokyo Street Fashion KAWAII♥PATEEN
_have fun with Fashion_
Tons of photos on Facebook :
https://www.facebook.com/Tokyo.Street.Fashion.KAWAII.PATEEN
Official site : http://waoryu.jp/kawaii-pateen
---------
Hi Every one, This is Kimura U. I am the pinkest creator in the universe.
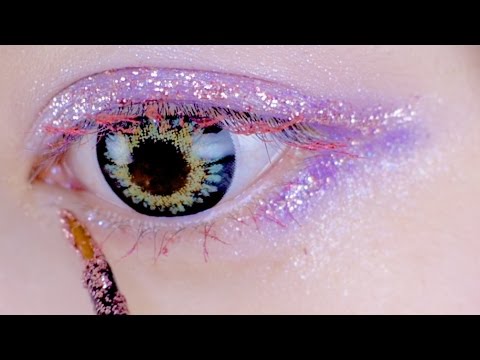
Today’s challenge is shiny eye makeup using color mascara.
Starting from base makeup.
Let’s start with powder foundation.
Let’s apply the eye shadows.
I will use this purple eye shadow.
Mix different types of purple, and balance the color.
Cover the edge of the eye with dark color and make a gradation.
Apply this gel eye color over it.
Don’t put directly to the eye. Put some on your finger and check the color.
Then apply.
The eye lid is thin, so gently blend it in.
Add some more purple eye shadow to the edge of the eye
Adding thick colors along the edge will make the eyes look wider
Voila! Let’s add this red color mascara
Apply by waving the mascara like this.
The bottom eye lashes are shorter compared to the top, so apply by putting the brush vertically
Using this glitter eye liner, let’s add to the eyelid and make it shiny.
Apply along the eye lid.
From the corner, stick out a bit and pull up to make it like a cat’s eye.
Do the same to the bottom eye lid.
Apply less to the bottom than the top.
Less is better.
Add a little to the inner corner as well.
This is how the eye is done.
Shiny shiny!
Let’s mix these 3 colors for the cheek.
Fluorescent pink, pale pink and a little pale pink. These 3 colors.
Under the pupils, stretch to the side.
Normally you put it around here, but put it in a higher position this time.
Today, let’s put some on the nose to make it look like sun burn.
Next, put this lip gloss. Pastel Pink.
Let’s put pink glitter over it.
When you put a lot over your lip, the distance between nose and lip will be close, which makes the baby face look.
This is color mascara for eye makeup, but I will try this on my eye brows.
Putting mascara on the eye brows.
Use this gold color.
Shake sideways just as you put mascara.
Using this pink brow pen for cosplays for the eyebrows.
Brow pen for cosplay has very strong colors, so gently apply.
Use a cotton bud to blend in.
Use this eye brow color and this cheek color to give some shadow to the eye brows.
This and this color.
lace some on the inner corner of the eye and blend your skin and eye brows.
Add some brown to the outer corner and blend in.
Let’s put these nail stickers like freckles.
There we go.
Now to arrange the hair a little.
Comb the hair and straighten it up, use a hair tie to bind the pigtails.
Twine a little of the hair where the knot is.
Make it fluffy and straighten it as if you used and iron.
The fashion theme today is using the Pink, as in the pinkest creator in the universe, Kimura U as a base, and eye make-up and fashion should also be pink.
This is the candy mille-feuille design which I drew as an illustration. It’s a sandwich of mille-feuilles with candy in between, and it is such a sweet girly design. This cardigan and tights was aligned with my candy mille-fille design.
So, the color mascara make-up is done!
Hi is it?
his was my first time to try this color mascara but I’m happy to have these colorful eyelashes!
Everybody in the world, please try it! Bye-bye.